The company has an agreement with the customer to receive,
store, deliver and transfer the latter’s no value inventory items. The
activities are done in the Inventory Control and Assembly Modules, the Warehouse
Management System, of iKonomikal Cloud ERP. The company derives revenues for
this agreement on rental storage facility of the warehouse and the handling
fees.
The agreement includes giving limited access to their
customer to the company’s iKonomikal Cloud ERP. The user from the customer is
restricted by iKonomikal to only see, do transactions and print documents or
reports on the items they stored in the warehouse or multiple warehouses.
The knowledge to gain is as follows:
1. Put
frequently used programs in the Shortcuts of Favorites Modules
2. Quick
Access to the Programs
3. Create
IC C/S Delivery Request by the company’s customer
4. Line
Items DataGrid Export and Import in Excel format
5. Save
and Print IC C/S Delivery Request document
6. Do
DayEnd of IC C/S Delivery Request document to create automatically the IC
Delivery transaction
7. Check
and Print IC Delivery transaction program by the company user
8. Post
IC Delivery
9. Print
Analysis Reports such as:
a)
IC Stock Ledger
b)
IC Item Balances
c)
IC Item Balances with Lot and Storage
d)
IC Stock History
e)
IC Stock Aging
The two programs to use in shipping are
1.
IC C/S Delivery Request document, and
2.
IC Delivery transaction
C/S means Customer/Supplier. While IC means Inventory
Control. and Assembly
The IC C/S Delivery Request program is being filled up and
day ended by customer’s authorized user to appear in the IC Delivery program.

No accounting entries is expected as the action is only to
request and no item movement will happen yet. Besides, the items have no
values.
The images below are
the ways to go to the IC C/S Delivery Request of iKonomikal Cloud ERP.
A click of IC C/S Delivery Request in the Favorites Modules
under Shortcuts list on the right side is the fastest way to go to the desired
program.

But this needs first to put the user program in the
Shortcuts list of the Favorites for the quick access. How to do it is just to
click the dark star icon to make it yellow. The yellow star indicates that the
program is already listed in the Shortcuts Favorites module as shown below. To
remove is just click the star icon into dark color.

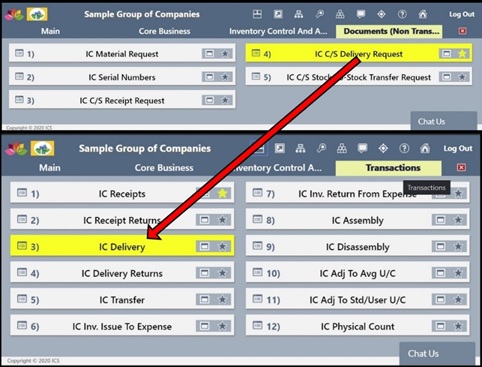
While the step by step procedure has to start by clicking
and following the flow of the arrows from the top:
Programs>Main>Core Business>Inventory Control and
Assembly>Documents (Non Transaction) >IC C/S Delivery Request

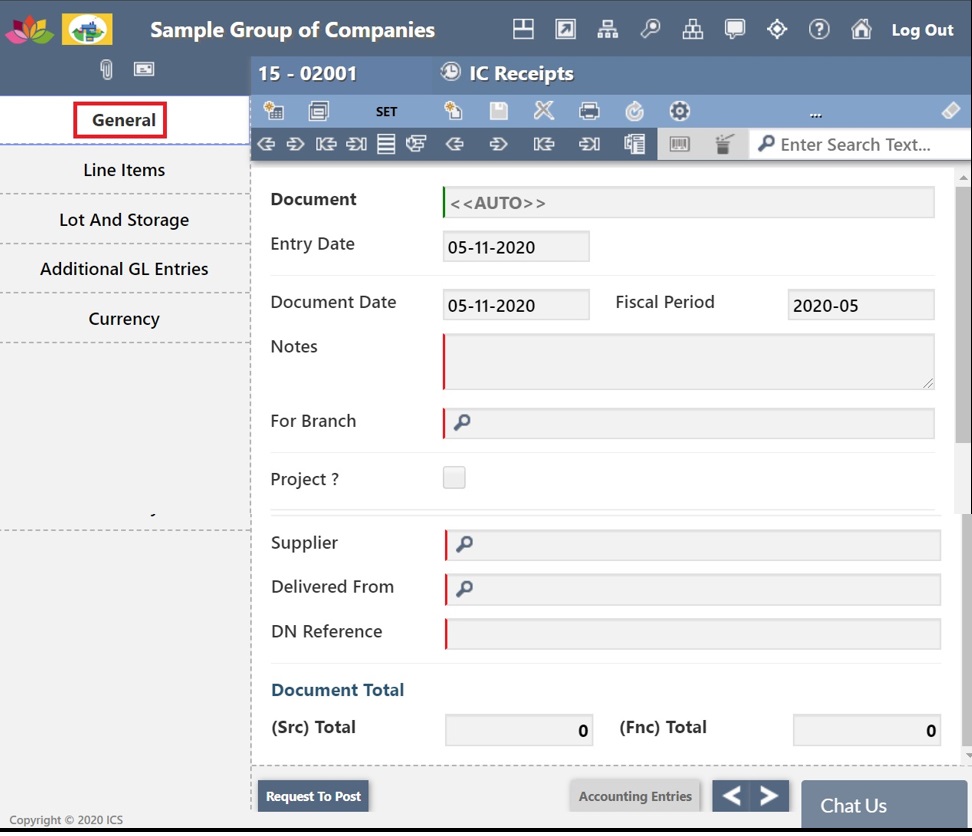
HOW TO CREATE IC C/S
DELIVERY REQUEST
1.
Click the IC C/S Delivery Request program
from the Document (Non Transaction) group of the Inventory Control and Assembly
Modules, the Warehouse Management System (WMS) of iKonomikal Cloud ERP. Then
click the create icon of New Document/Entry

2.
Fill the required information of
the General Tab
as follows:
Document Code
(Automatically generated upon saving or being inputted
before saving)
Notes (Brief
description of the request)
For Branch (Company or
Branch having the warehouse)
C/S Code
(Customer/Supplier who owns the inventory)
Deliver To (Address of
the Customer’s Customer)
Document Date (Date of
this request)
Line Item Icons to
Choose:
+ (plus) to add line for new items
- (minus) to remove item
Arrows up and down are to move the line item up or
down
Add multiple items
(self explanatory)
Options (threaded
wheel) icon is for DataGrid to export, import and
Check icon is to select
what item to minus, put up and minus
Line Item Columns to
Fill:
Item
Code
W/H
(Warehouse Code)
Department
(Code)
Quantity
UOM
(Unit of Measure)
Notes
Lot
(Production reference or Batch number)
Prod
Date (Production)
Exp
Date (Expiry)
Level
(location height code)
Area (site or block code)
Aisle (passage or street code)
Rack (structure or cabin code)
Shelf (bin, pallet, or holder code)


3.
Filling the Line Items through Export
and Import filled Excel Template of DataGrid
Click the “Options” , “Excel
DG Export” and “Save” icons per images below to open empty DataGrid Template in
excel

| EMPTY DATAGRID TEMPLATE |
To fill the Excel Line Items DataGrid Template

Click “Excel DG Import”,
select the file then click “Open” icons per images below to open filled DataGrid
Template in excel

Filled IC C/S Delivery Request


4.
Click the “Save” icon to save the
filled Document/Entry


5.
Click the “Print” icon to print the
IC C/S Delivery Request

Printed IC C/S Delivery Request

HOW TO TURN IC C/S DELIVERY REQUEST DOCUMENT TO IC
C/S DELIVERY TRANSACTION PROGRAM

The IC C/S Delivery Request
document is accomplished by the user of company’s customer. While the company’s user is for
the IC Delivery transaction. The latter releases the stock thereby moving it from
company’s warehouse without value to the customer’s customer or to whom the
request is stated.
Click “DayEnd” icon located
in the bottom near the left corner. The data is being completed and transferred
during DayEnd into transaction program. Click also the succeeding
icons to complete the DayEnd process.

HOW TO VERIFY AND PRINT THE TRANSFERRED IC C/S
DELIVERY REQUEST DOCUMENT DATA TO IC DELIVERY TRANSACTION PROGRAM
A click of “IC
Delivery” Transaction program in the Favorites Modules under Shortcuts list
on the right side is the fastest way to go to the desired program.

While the step by step procedure has to start by
clicking and following the flow of the arrows from the top:
Programs>Main>Core Business>Inventory Control
and Assembly>Transactions >IC Delivery

1.
Clicking the IC Deivery from the Shortcuts or
from Program Groups will show a blank document. See below

2.
The easy way to see the most recently DayEnded
IC C/S Delivery Request in the IC Delivery transaction program is by clicking
the Batch (to the right >I) arrow key or Last Record. Batch Number and Document
Entry Number represent the reference of the IC Delivery.

4.
Click the “Printer” icon to start the process
of printing.

Printed IC Delivery

HOW TO POST THE BATCH ENTRY OF IC DELIVERY TRANSACTION
PROGRAM
Post or Posting in iKonomikal Cloud ERP is the activity
of permanently recording the transaction in their respective registers such as
the Subsidiary Ledger and the General Ledger History. The post automatically
generates a posting reference number. The posting is being done in the Batch
which may contain one or multiple entries.
1.
Click the “SET” icon to show the reminder message. Click
“Yes” if correct. The SET becomes “UNSET”. At this point the Document/Entry is
unchangeable. The purpose of clicking UNSET is to go back to make a change.


2.
Click “Request To Post” icon on the mid left bottom
side. Then click the 2 succeeding “Yes” icons.

 |
| BATCH 3 ENTRY 1 PS#301 |
The Posting Sequence
Number also appears in the printed document.

PRINTED ANALYSIS REPORT
1) IC Stock Ledger


2) IC Item Balances


3) IC Item Balances with Lot and
Storage
 |
| FIRST PAGE |
 |
| LAST PAGE |
4) IC Stock History


1) IC Stock Aging


------------------------------------------------------------------------------------------
For inquiries contact:
Companies:
iKonomikal Cloud Services
Department of Trade and Industry Cert#: 04929944
Mayor’s Permit: BCN 1914-56
TIN: 224 089 131 VAT Registered
TR iKonomikal Consultants
Department of Trade and Industry Cert#: 04929961
Mayor’s Permit: BCN 1914-56-01
TIN: 224 089 131 VAT Registered
Address:
Ground Floor, TG Rolluqui Building
117 Burgos Street Corner Regalia Street
Brgy. Bagong Silang, Poblacion, Santa Cruz
Marinduque, 4902, Region 4B, Philippines
Links:
Skype: tgrolluqui@hotmail.com
Phones
M: +63 918 229 5934 (Smart)
M: +63 917 813 4905 (Globe)
T: +63 42 704 5312 (PLDT)
iKonomikal Cloud ERP
Software Website: https://ikonomikal.com
Company Website: https://hq.ikonomikal.com
Tech Updates: https://docs.ikonomikal.com/
Agreements: https://policy.ikonomikal.com/
------------------------------------------------------------------------------------------
Suggested modifications, customizations and developments with general industry use is FREE OF COST. 24/7 online Technical Support